Boost.Asio看这一篇就够了

Boost.Asio

简单来说,Boost.Asio是一个跨平台的c++网络和I/O库,使用它开发者能够使用现代c++语言和一致的异步模型进行程序开发.

背景

大部分程序都需要与外界交互,可能通过文件、网络、或者串口.有时候,网络通信,单个i/o操作需要很长时间完成.这给应用程序开发带来了特殊的挑战.

Boost.Asio提供了管理这些耗时操作的工具,而不需要开发人员使用基于传统线程和显式锁的并发模型.

核心概念和功能

Boost.Asio剖析

Boost.Asio可用来执行同步和异步操作,如socket上的i/o操作.接下来,我们通过一系列概念图来理解Boost.Asio是如何工作的.

先来看一下执行同步连接时发生的操作:

同步操作

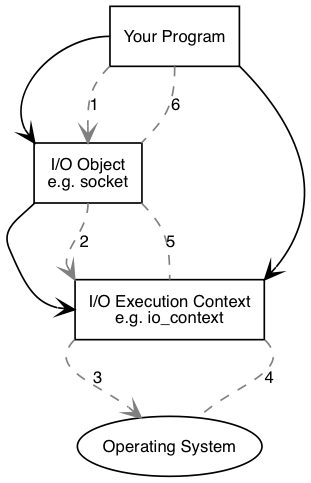
你的程序需要至少有一个io执行context,它是一个boost::asio::io_contextboost::asio::thread_pool、或boost::asio::system_context对象.这个io执行context将作为代理连接操作系统提供的io服务.

1
boost::asio::io_context io_context;

然后你的程序需要一个类似tcp socket的i/o对象来执行i/o操作.

1
boost::asio::ip::tcp::socket socket(io_context);
同步操作

执行了同步连接操作之后,下列事件会依次发生:

  1. 调用i/o对象初始化连接操作
1
socket.connect(server_endpoint);
  1. i/o对象将操作交给i/o执行context
  2. i/o执行context调用操作系统接口执行连接操作
  3. 操作系统将i/o执行结果返回给i/o执行context
  4. i/o执行context将操作的错误信息转换为boost::system::error_code. error_code可与特定值进行比较,或者测试其真值(false意味着没有错误).然后将执行结果传递回i/o对象.
  5. 如果操作失败,i/o对象抛出boost::system::system_error异常.如果操作以下面接口调用:
1
2
boost::system::error_code ec;
socket.connect(server_endpoint, ec);

那么则不会抛出异常,并且ec被设置为操作结果.
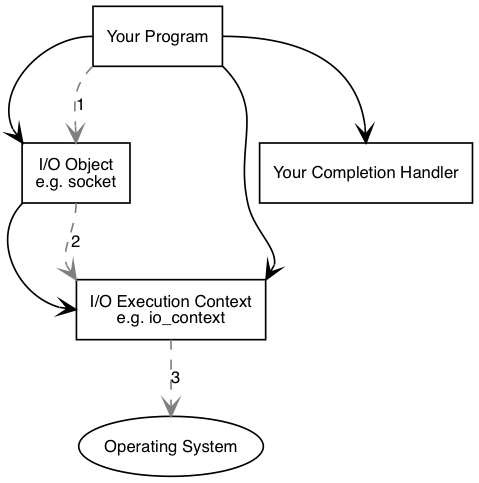
异步操作

执行了异步操作之后,将发生以下事件:

异步操作1

  1. 调用i/o对象初始化连接操作
1
socket.async_connect(server_endpoint, your_completion_handler);

其中your_completion_handler有以下签名:

1
void your_completion_handler(const boost::system::error_code& ec);

执行不同异步操作的完成函数有不同的签名.

  1. i/o对象将操作交给i/o执行context
  2. i/o执行context通知操作系统需要执行异步连接.
    时间流逝(在同步操作里,这个时间包含连接操作的全部时间).

异步操作2

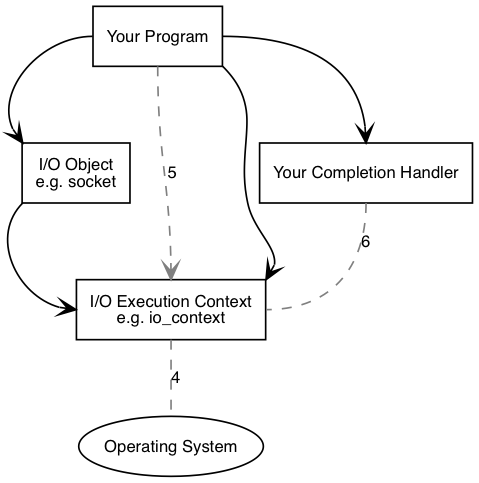
  1. 操作系统通过将执行结果放入一个队列来指示操作完成.这个结果可以被i/o执行context取出.
  2. 当使用io_context作为i/o执行context时,你的程序必须调用io_context::run(或者其它类似的成员函数)以检索结果.io_context::run在有未完成的异步操作时会一直阻塞,所以你可以在开始第一个异步操作后就调用它.
  3. io_context::run内部,i/o执行context获取操作结果,将其转化为error_code,然后传递给异步完成回调函数.

Proactor模式:不使用线程的并发

ProactorBoost

我们先看一下Proactor设计模式在Boost.Asio中的实现,其中不包含任何特定平台的细节:
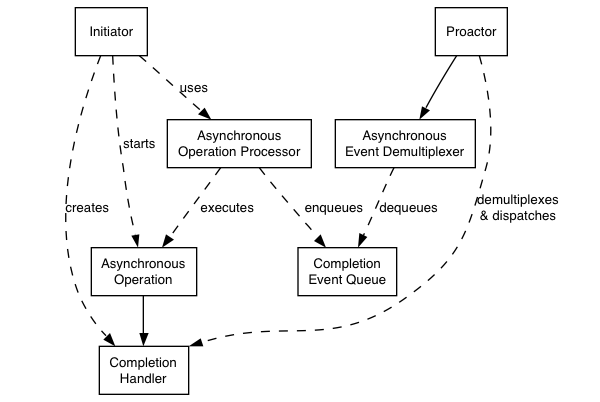
Proactor

Proactor模式:
  • 异步操作(Asynchronous Operation)

定义异步操作,比如:socket上的异步读/写.

  • 异步操作处理器(Asynchronous Operation Processor)

执行异步操作并在操作完成时向异步事件完成队列中存入完成事件.从高层视角来看,内部服务如reactive_socket_service是异步操作处理器

  • 事件完成队列(Completion Event Queue)

缓存完成事件,直到异步事件分发器从中取出事件.

  • 完成处理句柄(Completion Handler)

处理异步操作结果.这些函数对象通常使用boost::bind创建.

  • 异步事件解复用器(Asynchronous Event Demultiplexer)

阻塞直到完成事件队列有事件,然后将完成事件传递给调用者.

  • Proactor

调用异步事件解复用器来读取事件,然后将其分发给相关事件的完成处理句柄(比如.调用函数对象).这是io_context类所代表的抽象.

  • 初始化

应用程序通过高层的接口如basic_stream_socket启动特定的异步操作,这个接口将其代理给reactive_socket_service.

使用Reactor来实现

在很多平台上,Boost.Asio使用Reactor来实现Proactor模式,这些Reactor可能是select,epollkqueue

  • 异步操作处理

reactor使用select,epoll或者kqueue实现.当reactor表明资源已经就绪,处理器执行异步操作并将相关的完成处理函数加入完成事件队列中.

  • 完成事件队列

完成处理句柄(如函数对象)的链表.

  • 异步事件分发器

通过事件或条件变量在完成事件队列上等待完成句柄可用.

在windows上使用overlapped I/O
优势
  • 可移植
    Boost.Asio选择最合适的异步机制,如Windows上使用原生的异步I/O api,而在POSIX上使用epollselect.

  • 并发与线程解耦
    长时间的操作可以异步执行,因此程序不需要通过创建大量线程来提高并发度.

  • 高性能和可扩展
    使用异步操作有可能通过减少线程数量来避免过多的上下文切换开销,数据间同步和移动.

  • 简化同步
    异步处理可以在一个线程中完成,应用程序逻辑可以较少的关注同步问题.

  • 函数组合
    函数组合是指实现一个高层次操作的的函数,如以特定格式发送一个消息.每个函数都有可能多次调用底层读/写操作来实现.
    比如,考虑如下一个协议:每条消息由一个定长的消息头和一个可变的消息体构成.消息体的长度在消息头中指定.一个可能的read_message操作可以使用两次低级read实现,第一次用于接收消息头并获取长度,第二次接收整个消息体.
    可以用异步方式组合函数功能,异步操作可以进行链式连接.一个操作完成后可以初始化下一步操作.通过将这些操作封装到首次操作中,调用者感受不到高层操作是通过异步调用链实现的.

    通过组合操作的能力,可以更容易开发具有高级抽象的网络库,用于支持特定的协议.

    劣势

  • 编程复杂
    由于异步操作的初始化和完成在时间和空间上是分散的,因此编程更为复杂.另外,由于控制流的颠倒,应用程序的调试也会变得困难.

  • 内存开销
    缓冲区必须持续存在于读/写操作期间,这可能会持续不确定的时间,另外每次并发操作都需要单独的缓冲区.而Reactor模式,在socket就绪前不需要缓冲区用于读或写.

线程和Boost.Asio

线程安全

通常,并发地使用不同对象是安全的,但是并发地使用同一个对象是不安全的.但是,io_context提供了强保证,并发地使用其单一对象是安全的.

线程池

可以让多个线程调用io_context::run来使用线程池执行完成事件.这种方法还可以与post()方法一起使用作为在线程池间执行任意计算任务的方法.
注意所有调用io_context::run的线程是等价的,io_context可能以任意顺序分配任务.

内部线程

库的内部实现可能使用内部线程来模拟异步.这些线程应该尽可能地对用户不可见.另外,这些线程必须做到:

  • 不直接调用用户代码
  • 必须阻塞所有信号

这一方法得到了以下保证:

  • 异步完成处理函数只在调用io_context::run的线程中调用

因此,库的使用者有责任创建和管理所有线程及通知由哪个线程处理.

这种设计的原因有:

  • 通过在唯一的线程中调用io_context::run(),用户代码可以避免同步的复杂性.
  • 库的使用者可能需要在线程启动时执行一些初始化操作.如COMCoInitializeEx
  • 库的接口与线程创建和管理接口解耦,允许在不支持线程的平台上执行.

Stands: 在线程中使用无锁操作

strand被定义为严格地按顺序执行事件的处理函数.使用strand允许在多线程程序中执行代码而不需要显式的使用锁(比如,使用mutexes).

strand可以显式或隐式的使用,下面描述了几种方式:

  • 在唯一的线程中调用io_context::run(),这样所有的事件处理操作会隐式的串行执行,因为io_context保证所有的操作都在run()中执行.
  • 同一个connection上关联的异步操作链(eg.一个半双工HTTP实现),异步操作不可能并发地执行.这也是隐式的strand.
  • 显式的strand是一个strand<>io_context::strand的实例.所有的事件函数对象需要通过使用boost::asio::bind_executor()绑定到strand,或者通过strand对象的posted/dispatched方法.

在组合异步操作的情况下,比如async_read()async_read_until(),如果完成handler使用了strand,那么所有的间接操作也需要使用同样的strand.这是为了保证所有调用者和组合操作之间共享的任意对象的访问是线程安全的.(比如在socket上使用async_read,调用者可以进行close操作).

为了达到这种效果,所有的异步操作可以通过get_associated_executor函数来获取handler相关的executor.比如:

1
boost::asio::associated_executor_t<Handler> a = boost::asio::get_associated_executor(h);

相关的executor必须满足Executor的要求.它将被异步操作用来提交执行间接或者最后的handlers.
executor可以被特定的handler进行定制化,通过指定一个内嵌的type executor_type和成员函数get_executor():

1
2
3
4
5
6
7
8
9
10
11
12
13
14
class my_handler
{
public:
// Custom implementation of Executor type requirements.
typedef my_executor executor_type;

// Return a custom executor implementation.
executor_type get_executor() const noexcept
{
return my_executor();
}

void operator()() { ... }
};

对于更复杂的情况,可以直接定制化associated_executor模板:

1
2
3
4
5
6
7
8
9
10
11
12
13
14
15
16
17
18
19
20
21
22
struct my_handler
{
void operator()() { ... }
};

namespace boost { namespace asio {

template <class Executor>
struct associated_executor<my_handler, Executor>
{
// Custom implementation of Executor type requirements.
typedef my_executor type;

// Return a custom executor implementation.
static type get(const my_handler&,
const Executor& = Executor()) noexcept
{
return my_executor();
}
};

} } // namespace boost::asio

boost::asio::bind_executor()函数可以用来帮助绑定一个指定的executor对象,比如一个strand到完成handler.这种绑定自动关联一个上面展示的executor.比如,为了绑定一个strand我们可以像下面这样:

1
2
3
4
5
6
my_socket.async_read_some(my_buffer,
boost::asio::bind_executor(my_strand,
[](error_code ec, size_t length)
{
// ...
}));

无栈协程

coroutine类提供了对无栈协程的支持.无栈协程可以用同步的方式实现异步逻辑,而且开销很小.
下面是一个例子:

1
2
3
4
5
6
7
8
9
10
11
12
13
14
15
16
17
18
19
20
21
22
23
struct session : boost::asio::coroutine
{
boost::shared_ptr<tcp::socket> socket_;
boost::shared_ptr<std::vector<char> > buffer_;

session(boost::shared_ptr<tcp::socket> socket)
: socket_(socket),
buffer_(new std::vector<char>(1024))
{
}

void operator()(boost::system::error_code ec = boost::system::error_code(), std::size_t n = 0)
{
if (!ec) reenter (this)
{
for (;;)
{
yield socket_->async_read_some(boost::asio::buffer(*buffer_), *this);
yield boost::asio::async_write(*socket_, boost::asio::buffer(*buffer_, n), *this);
}
}
}
};

coroutine类与伪关键字reenter,yieldfork结合起来使用.它们是预编译宏,使用了与Duff装置相似的技术.

有栈协程

spawn()函数是运行有栈协程的一个高层接口.
下面是示例代码:

1
2
3
4
5
6
7
8
9
10
11
12
13
14
15
16
17
18
19
20
21
22
23
boost::asio::spawn(my_strand, do_echo);

// ...

void do_echo(boost::asio::yield_context yield)
{
try
{
char data[128];
for (;;)
{
std::size_t length =
my_socket.async_read_some(
boost::asio::buffer(data), yield);

boost::asio::async_write(my_socket,
boost::asio::buffer(data, length), yield);
}
}
catch (std::exception& e)
{
// ...
}
  • spawn()的第一个参数可以是strand,io_context或者completion handler.这个参数决定了协程可以执行的context.比如,一个服务的每个客户对象可能由多个协程组成;它们应该运行在相同的strand上,这样就不需要额外的同步操作.

  • 第二个参数是一个具有如下签名的函数对象:

1
void coroutine(boost::asio::yield_context yield);

用于指定协程将要执行的代码.参数yield可以在需要的时候作为completion handler传递给一个异步操作,比如:

1
2
3
std::size_t length =
my_socket.async_read_some(
boost::asio::buffer(data), yield);

上面的代码开启了一个异步操作并将当前协程挂起,协程将会在异步操作完成后继续执行.
异步操作的handler签名如下:

1
void handler(boost::system::error_code ec, result_type result);

初始函数返回result_type.在上面的async_read_some例子中,是size_t.如果异步操作失败,error_code会转换成system_error异常并抛出.
对应的handler签名如下:

1
void handler(boost::system::error_code ec);

要收集error_code而不抛出异常,可以向下面代码那样关联输出到yield_context:

1
2
3
4
boost::system::error_code ec;
std::size_t length =
my_socket.async_read_some(
boost::asio::buffer(data), yield[ec]);

:如果对spawn()使用定制的Handler类型,函数对象的原型如下:

1
void coroutine(boost::asio::basic_yield_context<Handler> yield);

支持协程TS

通过awaitable类模板,use_awaitable完成标识和co_spawn()函数来支持协程TS,这些工具结合使用co_await关键字可以使开发者以同步的方式实现异步操作.

1
2
3
4
5
6
7
8
9
10
11
12
13
14
15
16
17
18
19
20
21
22
23
24
25
boost::asio::co_spawn(executor,
[socket = std::move(socket)]() mutable
{
return echo(std::move(socket));
},
boost::asio::detached);

// ...

boost::asio::awaitable<void> echo(tcp::socket socket)
{
try
{
char data[1024];
for (;;)
{
std::size_t n = co_await socket.async_read_some(boost::asio::buffer(data), boost::asio::use_awaitable);
co_await async_write(socket, boost::asio::buffer(data, n), boost::asio::use_awaitable);
}
}
catch (std::exception& e)
{
std::printf("echo Exception: %s\n", e.what());
}
}

co_spawn()的第一参数是允许coroutine执行的executor.比如,一个服务的某个客户端对象可能包含多个协程;为了避免额外的同步操作,它们需要运行在同一个strand.

第二个参数是一个返回值为boost::asio::awaitable<R>的函数对象,Rcoroutine的返回值,在上面的例子中是void.

第三个参数是一个完成标识,co_spawn()用它来创建签名为void(std::exception_ptr, R)的完成函数.当协程运行完成时,完成函数会用协程的返回值来调用.上面的例子中是boost::asio::detached,代表忽略协程的返回值.

在上面的例子中,协程体由echo函数实现.当向异步操作传递use_awaitable完成标识时,异步操作的返回值可以使用co_wait关键字来获取:

1
std::size_t n = co_await socket.async_read_some(boost::asio::buffer(data), boost::asio::use_awaitable);

异步操作的handler有如下签名:

1
void handler(boost::system::error_code ec, result_type result);

这时co_wait表达式的返回类型就是result_type.上面的async_read_some的返回值是size_t,如果异步操作失败,error_code会转换为system_error异常并抛出.此时handler签名为:

1
void handler(boost::system::error_code ec);

此时co_wait产生一个void返回值.对于上面例子来说,错误以system_error异常的形式传递给协程.

性能分析---诡异问题定位始末,clock_gettime造成系统整体负载过高

诡异问题定位始末—-clock_gettime造成系统整体负载过高

问题背景

有一台linux服务器测试环境cpu经常到达80%,造成系统卡顿,部分功能不可用.

分析步骤

1.使用perf制作cpu火焰图

通过制作cpu火焰图,发现很多进程都存在大量的clock_gettime系统调用.

clock_gettime

2.进一步查看clock_gettime的调用次数
1
2
3
4
5
6
7
8
9
10
11
12
13
14
15
16
17
18
19
20
21
22
23
24
25
26
27
28
29
root@10003:~# /usr/share/bcc/tools/funclatency '*clock_gettime*' -d 30
Tracing 6 functions for "*clock_gettime*"... Hit Ctrl-C to end.

nsecs : count distribution
0 -> 1 : 0 | |
2 -> 3 : 0 | |
4 -> 7 : 0 | |
8 -> 15 : 0 | |
16 -> 31 : 0 | |
32 -> 63 : 0 | |
64 -> 127 : 0 | |
128 -> 255 : 0 | |
256 -> 511 : 0 | |
512 -> 1023 : 0 | |
1024 -> 2047 : 413453 |**** |
2048 -> 4095 : 1815900 |******************** |
4096 -> 8191 : 3576475 |****************************************|
8192 -> 16383 : 2350047 |************************** |
16384 -> 32767 : 405074 |**** |
32768 -> 65535 : 28429 | |
65536 -> 131071 : 9908 | |
131072 -> 262143 : 631 | |
262144 -> 524287 : 248 | |
524288 -> 1048575 : 58 | |
1048576 -> 2097151 : 128 | |
2097152 -> 4194303 : 1707 | |
4194304 -> 8388607 : 2 | |

avg = 7966 nsecs, total: 68529765602 nsecs, count: 8602313

怎么样?是不是很夸张,30s内调用了近千万次,耗时也很可观.

3.因为还有其它环境负载类似,因此对比了另外一个环境的情况
1
2
3
4
5
6
# /usr/share/bcc/tools/funccount "*clock_gettime*" -d 10
Tracing 6 functions for "*clock_gettime*"... Hit Ctrl-C to end.

FUNC COUNT
__x64_sys_clock_gettime 334
Detaching...

!!!这根本不是一个量级好吧?为什么异常的服务器会多出如此多的系统调用呢?

4.进一下分析clock_gettime的实现原理

4.1 系统调用

系统调用需要从用户态切换到内核态,因此相对开销较大,为了优化频繁调用的函数的开销,linux使用了vdso机制.

vdso原理

4.2 哪些函数可以使用vdso
1
2
3
4
5
6
7
8
9
10
x86-64 functions
The table below lists the symbols exported by the vDSO. All of
these symbols are also available without the "__vdso_" prefix,
but you should ignore those and stick to the names below.
symbol version
─────────────────────────────────
__vdso_clock_gettime LINUX_2.6
__vdso_getcpu LINUX_2.6
__vdso_gettimeofday LINUX_2.6
__vdso_time LINUX_2.6
4.3 clock_gettime为什么是系统调用

既然clock_gettime可以通过vdso,为什么异常系统上还会有这么多系统调用呢?

4.4 根因

时间相关的几个函数与系统时钟源密切相关,linux启动时会根据精度和开销选取最佳时钟源.

下文是关于时钟源的说明:

1
2
3
4
5
6
7
内核在启动过程中会根据既定的优先级选择时钟源。优先级的排序根据时钟的精度与访问速度。
其中CPU中的TSC寄存器是精度最高(与CPU最高主频等同),访问速度最快(只需一条指令,一个时钟周期)的时钟源,因此内核优选TSC作为计时的时钟源。其它的时钟源,如HPET, ACPI-PM,PIT等则作为备选。
但是,TSC不同与HPET等时钟,它的频率不是预知的。因此,内核必须在初始化过程中,利用HPET,PIT等始终来校准TSC的频率。如果两次校准结果偏差较大,则认为TSC是不稳定的,则使用其它时钟源。并打印内核日志:Clocksource tsc unstable.

正常来说,TSC的频率很稳定且不受CPU调频的影响(如果CPU支持constant-tsc)。内核不应该侦测到它是unstable的。但是,计算机系统中存在一种名为SMI(System Management Interrupt)的中断,该中断不可被操作系统感知和屏蔽。如果内核校准TSC频率的计算过程quick_ pit_ calibrate ()被SMI中断干扰,就会导致计算结果偏差较大(超过1%),结果是tsc基准频率不准确。最后导致机器上的时间戳信息都不准确,可能偏慢或者偏快。

当内核认为TSC unstable时,切换到HPET等时钟,不会给你的系统带来过大的影响。当然,时钟精度或访问时钟的速度会受到影响。通过实验测试,访问HPET的时间开销为访问TSC时间开销的7倍左右。如果您的系统无法忍受这些,可以尝试以下解决方法: 在内核启动时,加入启动参数:tsc=reliable

tsc是最优时钟源,当使用它时,时间相关函数可以通过vdso实现,而当退化而使用其它时钟源时,就需要走真正的系统调用了.那么,我们系统上是这种情况吗?

dmesg查看到如下输出:

1
2
3
4
5
6
7
# dmesg | grep clock
[ 3007.005852] clocksource: timekeeping watchdog on CPU0: Marking clocksource 'tsc' as unstable because the skew is too large:
[ 3007.005853] clocksource: 'acpi_pm' wd_now: 13f3cd wd_last: f657df mask: ffffff
[ 3007.005854] clocksource: 'tsc' cs_now: 96685727fda cs_last: 95aef19df08 mask: ffffffffffffffff
[ 3007.005854] tsc: Marking TSC unstable due to clocksource watchdog
[ 3007.006767] sched_clock: Marking unstable (3006972692137, 33974437)<-(3007014491200, -7725623)
[ 3007.007138] clocksource: Switched to clocksource acpi_pm

tsc: Marking TSC unstable due to clocksource watchdog可以看到确实如此,tsc已经被抛弃了

因此,有问题的系统上由于tsc失效,时间相关函数由vdso退化为系统调用,造成系统负载过高.

发现有前辈也遇到类似问题,分析更细致

解决方法

修改/etc/default/grub配置tsc:

1
GRUB_CMDLINE_LINUX="... clocksource=tsc tsc=reliable"

这就是普通人操劳又遗憾的一生吧【女生版】

Cgroup v2 and Page cache

Cgroup v2 and Page Cache

cgroup子系统是进行公平分配和限制系统资源的方式.它通过树形结构组织所有的数据,叶子节点
依赖父节点并继承它们的设置.另外,cgroup提供很多资源的计数和统计.

cgroup控制无处不在.即使你没有显式的使用它们,它们在现代Linux发行版中也是默认打开并与systemd集成在一起.

概览

cgroup对理解page cache使用中有重要的意义.它还帮助调试问题和配置软件有更好的状态.
比如,通过cgroup内存限制可以对lru的长度和驱逐进行控制.

cgroup v2中有一个v1中没有的重要主题,就是可以跟踪page cache的io回写.
v1无法理解生成disk IOPS的group,这样就不能正确的追踪和限制disk操作.
幸运地是,v2版本修复了这些问题,它已经提供了一些新特性可以帮助控制page cache回写.

找出所有groups和它们限制的方法是查看/sys/fs/cgroup.但是你可以使用更简单的方法:

systemd-cglssystemd-top

Memory cgroup files

现在,让我们从page cache的角度来回顾cgroup中的最重要部分.

    1. memory.current:展示cgroup和其后代当前使用的总内存,当然包括page cache的大小
    1. memory.stat:显示许多内存计数,最重要的一些信息可以通过file来过滤.
    1. memory.numa_stat:显示每个NUMA节点的状态
    1. memory.min, memory.low, memory.high, memory.max-cgroup限制. cgroup v2文档

模板元编程实例---如何设计通用的几何库

模板元编程实例—如何设计通用的几何库

设计原理

假设你需要使用c++程序来计算两点间的距离.你可能会这样做:

  • 先定义一个struct:

    1
    2
    3
    4
    struct mypoint
    {
    double x, y;
    };
  • 然后定义一个包含计算算法的函数:

    1
    2
    3
    4
    5
    6
    double distance(mypoint const& a, mypoint const& b)
    {
    double dx = a.x - b.x;
    double dy = a.y - b.y;
    return sqrt(dx * dx + dy * dy);
    }

相当简单而实用,但是不够通用.一个库的设计需要考虑未来可能的变化.
上面的设计只能用于笛卡尔坐标系中的2D点.
通用的库需要能够计算如下距离:

  • 适用于任何point struct或者point class,而不是只适用于mypoint.
  • 不只是二维
  • 适用于其它坐标系统,如地球或球体上
  • 能够计算点与线或者其它几何图形之间的距离
  • double更高的精度
  • 尽可能避免使用sqrt:通常我们不希望调用它,因为它的开销比较大.而且对于比较距离时没有必要.

接下来,我们将一步一步给出一个更通用的实现.

使用模板

我们可以将距离函数改为模板函数.这样就可以计算除mypoint之外的其他点类型之间的距离.
我们添加两个模板参数,允许输入两种不同的点类型.

1
2
3
4
5
6
7
template <typename P1, typename P2>
double distance(P1 const& a, P2 const& b)
{
double dx = a.x - b.x;
double dy = a.y - b.y;
return std::sqrt(dx * dx + dy * dy);
}

模板版本比之前的实现好一些,但是还不够.
考虑c++类的成员变量为protected或者不能直接访问x,y.

使用Traits

我们需要使用一种更通用的方法来允许任意的点类型都能够作为距离函数的输入.
除了直接访问xy,我们将添加一层间接层,使用traits系统.
距离函数可以变为:

1
2
3
4
5
6
7
template <typename P1, typename P2>
double distance(P1 const& a, P2 const& b)
{
double dx = get<0>(a) - get<0>(b);
double dy = get<1>(a) - get<1>(b);
return std::sqrt(dx * dx + dy * dy);
}

上面的距离函数使用了get函数来访问一个点的坐标系统,使用点的维度作为模板参数.
get可以这样实现:

1
2
3
4
5
namespace traits
{
template <typename P, int D>
struct access {};
}

定义mypoint的模板特例:

1
2
3
4
5
6
7
8
9
10
11
12
13
namespace traits
{
template <>
struct access<mypoint, 0>
{
static double get(mypoint const& p)
{
return p.x;
}
};
// same for 1: p.y
...
}

现在通过调用traits::access<mypoint, 0>::get(a)就可以返回坐标系中的x.我们可以通过定义get来进一步简化调用方式:

1
2
3
4
5
template <int D, typename P>
inline double get(P const& p)
{
return traits::access<P, D>::get(p);
}

通过上面的实现,我们就可以对任何特化了traits::accesspoint a调用get<0>(a).
同样的原理,我们也可以实现对于坐标yget<1>(a).

任意维度

为了实现对任意维度的计算,我们可以通过循环来遍历所有维度.但是循环调用相对于直接计算会有性能开销.因此我们可以通过使用模板实现这样的算法:

1
2
3
4
5
6
7
8
9
10
11
12
13
14
15
16
17
18
template <typename P1, typename P2, int D>
struct pythagoras
{
static double apply(P1 const& a, P2 const& b)
{
double d = get<D-1>(a) - get<D-1>(b);
return d * d + pythagoras<P1, P2, D-1>::apply(a, b);
}
};

template <typename P1, typename P2 >
struct pythagoras<P1, P2, 0>
{
static double apply(P1 const&, P2 const&)
{
return 0;
}
};

然后距离函数可以调用pythagoras并指定维度:

1
2
3
4
5
6
7
template <typename P1, typename P2>
double distance(P1 const& a, P2 const& b)
{
BOOST_STATIC_ASSERT(( dimension<P1>::value == dimension<P2>::value ));

return sqrt(pythagoras<P1, P2, dimension<P1>::value>::apply(a, b));
}

维度可以通过定义另外一个traits类来实现:

1
2
3
4
5
namespace traits
{
template <typename P>
struct dimension {};
}

然后针对相应的类(如mypoint)进行特例化,因为这个traits只是发布一个值,因此为了简便我们可以继承Boost.MPL中的class boost::mpl::int_:

1
2
3
4
5
6
namespace traits
{
template <>
struct dimension<mypoint> : boost::mpl::int_<2>
{};
}

现在我们就实现了对任意维度点进行计算距离的算法.我们还使用编译期断言来防止对两个不同维度的点进行计算.

坐标类型

在上面的实现中,我们假设了double类型,如果点是integer呢?

1
2
3
4
5
6
7
8
9
10
11
12
namespace traits
{
template <typename P>
struct coordinate_type{};

// specialization for our mypoint
template <>
struct coordinate_type<mypoint>
{
typedef double type;
};
}

access函数类似,我们同样添加一个代理:

1
2
template <typename P>
struct coordinate_type : traits::coordinate_type<P> {};

然后我们可以修改我们的距离计算函数.因为计算的两个point类型可能有不同的类型,我们必须处理这种情况.我们需要选择其中一种具有更高精度的类型作为结果类型,我们假设有一个select_most_precise元函数用于选择最佳类型.

这样我们的计算函数可以改为:

1
2
3
4
5
6
7
8
9
10
11
12
13
14
15
template <typename P1, typename P2, int D>
struct pythagoras
{
typedef typename select_most_precise
<
typename coordinate_type<P1>::type,
typename coordinate_type<P2>::type
>::type computation_type;

static computation_type apply(P1 const& a, P2 const& b)
{
computation_type d = get<D-1>(a) - get<D-1>(b);
return d * d + pythagoras <P1, P2, D-1> ::apply(a, b);
}
};

不同的形状

我们已经设计了一个支持任意维度和任意坐标系统中的点的实现.
现在我们需要看看如何支持计算点与多边形或者点与线之间的距离.
支持这些形式对之前的设计会有较大的影响,我们不想添加另外一个名称的函数,如:

1
2
template <typename P, typename S>
double distance_point_segment(P const& p, S const& s)

我们想更加通用,距离函数的调用者最好不用关心形状的类型,我们也无法通过重载类实现,因为模板的签名相同,会有二义性.
有两种解决方法:

  • tag dispatching
  • SFINAE

在这里,我们选择tag dispatching因为它适合于`traits`系统.

使用tag dispatching,距离计算算法检查输入的几何形状类型.
我们的距离函数将变成:

1
2
3
4
5
6
7
8
9
10
template <typename G1, typename G2>
double distance(G1 const& g1, G2 const& g2)
{
return dispatch::distance
<
typename tag<G1>::type,
typename tag<G2>::type,
G1, G2
>::apply(g1, g2);
}

使用tag元函数获取类型然后将调用转交给dispatch::distanceapply方法.
tag元函数是另一个traits类,需要被point类特例化:

1
2
3
4
5
6
7
8
9
10
11
12
namespace traits
{
template <typename G>
struct tag {};

// specialization
template <>
struct tag<mypoint>
{
typedef point_tag type;
};
}

Tags (point_tag, segment_tag, etc)是用于特例化dispatch struct的空结构.
distancedispatch struct和其特例化都定义于另外一个单独的命名空间中:

1
2
3
4
5
6
7
8
9
10
11
12
13
14
15
16
17
18
19
20
21
22
23
24
25
26
27
28
29
30
31
32
33
34
35
36
37
namespace dispatch {
template < typename Tag1, typename Tag2, typename G1, typename G2 >
struct distance
{};

template <typename P1, typename P2>
struct distance < point_tag, point_tag, P1, P2 >
{
static double apply(P1 const& a, P2 const& b)
{
// here we call pythagoras
// exactly like we did before
...
}
};

template <typename P, typename S>
struct distance
<
point_tag, segment_tag, P, S
>
{
static double apply(P const& p, S const& s)
{
// here we refer to another function
// implementing point-segment
// calculations in 2 or 3
// dimensions...
...
}
};

// here we might have many more
// specializations,
// for point-polygon, box-circle, etc.

} // namespace

现在,距离算法对所有不同的几何形状都是通用的.
还有一个缺点是:我们必须为point,segment特例化2个dispatch.

1
2
3
4
5
6
7
8
point a(1,1);
point b(2,2);
std::cout << distance(a,b) << std::endl;
segment s1(0,0,5,3);
std::cout << distance(a, s1) << std::endl;
rgb red(255, 0, 0);
rbc orange(255, 128, 0);
std::cout << "color distance: " << distance(red, orange) << std::endl;

性能分析---内存篇page_fault

分析步骤

1.sar -B 1整体分析,重点关注fault/s

1
2
3
4
5
6
7
8
9
# sar -B 1
Linux 5.4.0-92-generic (zhangxa-Precision-3650-Tower-docker) 01/17/22 _x86_64_ (16 CPU)

11:35:37 pgpgin/s pgpgout/s fault/s majflt/s pgfree/s pgscank/s pgscand/s pgsteal/s %vmeff
11:35:38 0.00 8.00 44450.00 0.00 77339.00 0.00 0.00 0.00 0.00
11:35:39 0.00 8.00 42506.00 0.00 77688.00 0.00 0.00 0.00 0.00
11:35:40 0.00 112.00 46485.00 0.00 78169.00 0.00 0.00 0.00 0.00
11:35:41 0.00 8.00 43213.00 0.00 67424.00 0.00 0.00 0.00 0.00
11:35:42 0.00 232.00 44876.00 0.00 70478.00 0.00 0.00 0.00 0.00

fault/s: minflt/s + majflt/s的总和.

minflt/s: 标识进程在频繁的申请使用内存.物理内存未建立vma映射,如malloc后首次写这块内存.

对应的linux内核代码如下:

1
2
3
4
5
6
7
8
9
vm_fault_t handle_mm_fault(struct vm_area_struct *vma, unsigned long address,
unsigned int flags, struct pt_regs *regs)
{
vm_fault_t ret;

__set_current_state(TASK_RUNNING);

count_vm_event(PGFAULT);
count_memcg_event_mm(vma->vm_mm, PGFAULT);

majflt/s: 这个数值增长一般说明需要进行i/o操作,所需的内存页不在主存中,需要与磁盘或者swap分区交互.

有以下几种可能的情况:

  1. 指需要的内存页不在主存中,需要从磁盘中swap in,出现这种情况说明内存很紧张,频繁使用swap空间

对应内核代码如下:

1
2
3
4
5
6
7
8
9
10
11
12
13
14
15
16
vm_fault_t do_swap_page(struct vm_fault *vmf) {
...
page = lookup_swap_cache(entry, vma, vmf->address);
...
if (!page) {
...
if (!page) {
...
}

/* Had to read the page from swap area: Major fault */
ret = VM_FAULT_MAJOR;
count_vm_event(PGMAJFAULT);
count_memcg_event_mm(vma->vm_mm, PGMAJFAULT);
} else if (PageHWPoison(page)) {

  1. 还有一种情况是,使用mmap file后,file对应的磁盘内容未在cache中,需要从磁盘中加载.

对应内核代码如下:

1
2
3
4
5
6
7
8
9
10
11
12
13
14
15
m_fault_t filemap_fault(struct vm_fault *vmf)
{
...
/*
* Do we have something in the page cache already?
*/
page = find_get_page(mapping, offset);
if (likely(page)) {
...
} else {
/* No page in the page cache at all */
count_vm_event(PGMAJFAULT);
count_memcg_event_mm(vmf->vma->vm_mm, PGMAJFAULT);
ret = VM_FAULT_MAJOR;
...
  1. 共享内存使用的page需要从磁盘中swap in
1
2
3
4
5
6
7
8
9
10
11
12
13
14
15
static int shmem_swapin_page(struct inode *inode, pgoff_t index,
struct page **pagep, enum sgp_type sgp,
gfp_t gfp, struct vm_area_struct *vma,
vm_fault_t *fault_type)
{
...
/* Look it up and read it in.. */
page = lookup_swap_cache(swap, NULL, 0);
if (!page) {
/* Or update major stats only when swapin succeeds?? */
if (fault_type) {
*fault_type |= VM_FAULT_MAJOR;
count_vm_event(PGMAJFAULT);
count_memcg_event_mm(charge_mm, PGMAJFAULT);
}

2. 使用pidstat -r 1查找重点进程.

如果通过sar -B 1发现确实有minflt过高的情况,可以再进一步分析下是哪些进程过高.

1
2
3
4
5
6
7
8
9
10
11
# pidstat -r 1
Linux 5.4.0-92-generic (zhangxa-Precision-3650-Tower) 2022年01月17日 _x86_64_ (16 CPU)

14时10分24秒 UID PID minflt/s majflt/s VSZ RSS %MEM Command
14时10分25秒 0 596 39214.85 0.00 5057788 535560 1.64 xxxx
14时10分25秒 0 604 2912.87 0.00 613568 29060 0.09 xxxx
14时10分25秒 1000 7933 3.96 0.00 48976024 392652 1.20 xxxx
14时10分25秒 1000 7972 41.58 0.00 38258284 376548 1.16 xxxx
14时10分25秒 1000 18189 1.98 0.00 38302664 91664 0.28 xxxx
14时10分25秒 1000 32463 130.69 0.00 38268380 444256 1.36 xxxx

3. 对重点进程进行针对性分析

找到了重点进程以后,我们就可以对malloc等内存分配相关函数和page_fault相关函数进行分析,下面介绍几种方法

3.1 分析malloc次数

使用bcc工具分析malloc的调用次数,-p指定进程并跟踪-d 1010s.

1
2
3
4
5
# funccount -p 596 c:malloc -d 10
Tracing 1 functions for "c:malloc"... Hit Ctrl-C to end.

FUNC COUNT
malloc 1082371

可以看到malloc的调用次数确实很多,可以再分析一下page_fault的次数,如果libc内存池比较友好则page_fault会比较少.

1
2
3
4
5
# funccount -p 596 t:exceptions:page_fault_user -d 10
Tracing 1 functions for "t:exceptions:page_fault_user"... Hit Ctrl-C to end.

FUNC COUNT
exceptions:page_fault_user 382565

可以看到page_fault占了35%左右,因此我们可以继续分析malloc或page_fault的调用栈火焰图

3.2 分析malloc大小

在一些情况下,分析出malloc的大小分布结合业务代码可以有一定的借鉴意义.
这里介绍使用bpftrace工具分析申请大小的分布情况

我们使用uprobe对指定进程的malloc按第一个参数即申请大小进行统计.

1
2
3
4
5
6
7
8
9
10
11
12
13
14
15
16
17
18
19
20
21
22
23
24
# bpftrace -e 'uprobe:libc:malloc /pid == 596/ { @bytes = hist(arg0); }'
Attaching 1 probe...
^C

@bytes:
[2, 4) 12 | |
[4, 8) 1958 | |
[8, 16) 13766 |@ |
[16, 32) 160884 |@@@@@@@@@@@@@@@@@@@@ |
[32, 64) 154233 |@@@@@@@@@@@@@@@@@@@ |
[64, 128) 221739 |@@@@@@@@@@@@@@@@@@@@@@@@@@@@ |
[128, 256) 129597 |@@@@@@@@@@@@@@@@ |
[256, 512) 56802 |@@@@@@@ |
[512, 1K) 60331 |@@@@@@@ |
[1K, 2K) 29223 |@@@ |
[2K, 4K) 4590 | |
[4K, 8K) 3283 | |
[8K, 16K) 1740 | |
[16K, 32K) 3724 | |
[32K, 64K) 611 | |
[64K, 128K) 406205 |@@@@@@@@@@@@@@@@@@@@@@@@@@@@@@@@@@@@@@@@@@@@@@@@@@@@|
[128K, 256K) 7965 |@ |
[256K, 512K) 61044 |@@@@@@@ |

3.3 分析malloc火焰图

继续使用bcc工具`stackcount`

1
2
# stackcount -f -PU c:malloc -p 596 -D 30 > malloc.txt # 采集30s指定进程malloc的用户态栈
# FlameGraph/flamegraph.pl < malloc.txt > malloc.svg # 生成火焰图

3.4 分析page_fault火焰图

继续使用bcc工具`stackcount`

1
2
# stackcount -f -PU t:exceptions:page_fault_user -p 596 -D 30 > page_fault.txt # 采集30s指定进程page_fault调用栈
# FlameGraph/flamegraph.pl < page_fault.txt > page_fault.svg # 生成火焰图

4. 根据火焰图结合业务代码进行具体的优化

性能优化---内存分析工具详解

性能优化 —- 内存相关工具详解

sar -B 命令

sar -B命令用于报告page相关的系统活动,我们来依次看一下每项输出的具体含义

pgpgin/s:系统每秒从磁盘读取到内存页的数据大小(kb)

我们可以读取一个系统的大文件,这样就能观测到此值的增加.

1
2
3
4
5
6
7
8
9
10
11
12
13
14
15
16
17
$ cat 1.txt  # 1.txt是我创建的一个大文件

# sar -B 1
Linux 5.11.0-44-generic (zhangxa-VirtualBox) 2022年01月16日 _x86_64_ (2 CPU)

09时38分16秒 pgpgin/s pgpgout/s fault/s majflt/s pgfree/s pgscank/s pgscand/s pgsteal/s %vmeff

09时38分47秒 0.00 0.00 0.00 0.00 0.00 0.00 0.00 0.00 0.00
09时38分48秒 1336.00 0.00 146.00 1.00 144.00 0.00 0.00 0.00 0.00
09时38分49秒 3072.00 0.00 0.00 0.00 184.00 0.00 0.00 0.00 0.00
09时38分50秒 3840.00 0.00 0.00 0.00 273.00 0.00 0.00 0.00 0.00
09时38分51秒 4096.00 0.00 0.00 0.00 520.00 0.00 0.00 0.00 0.00
09时38分52秒 3840.00 0.00 0.00 0.00 305.00 0.00 0.00 0.00 0.00
09时38分53秒 4096.00 12.00 0.00 0.00 248.00 0.00 0.00 0.00 0.00
09时38分54秒 3072.00 0.00 0.00 0.00 224.00 0.00 0.00 0.00 0.00
09时38分55秒 1024.00 0.00 0.00 0.00 73.00 0.00 0.00 0.00 0.00
09时38分56秒 1536.00 0.00 0.00 0.00 80.00 0.00 0.00 0.00 0.00

pgpgout/s:系统每秒从内存页写入到磁盘的数据大小(kb)

这一项和pgpgin正好相反,我们可以循环写一个大文件,这里要注意,我们需要手工调用sync,以便能触发立即写入磁盘.

1
2
3
4
5
6
7
8
$ while [ 1 = 1 ] ; do echo "hello the worldaaaaaaaaa1111111111111111" >> ./1.txt; sync; done

# sar -B 1
Linux 5.11.0-44-generic (zhangxa-VirtualBox) 2022年01月16日 _x86_64_ (2 CPU)

09时42分00秒 pgpgin/s pgpgout/s fault/s majflt/s pgfree/s pgscank/s pgscand/s pgsteal/s %vmeff
09时42分01秒 0.00 12488.00 84738.00 0.00 54856.00 0.00 0.00 0.00 0.00
09时42分02秒 0.00 12144.00 81464.00 0.00 52669.00 0.00 0.00 0.00 0.00

fault/s:系统中未命中page fault的次数

majflt和minflt都会引起这个值增长

其中minflt增长的一般原因有:
一种是文件系统cache未命中,需要从磁盘中读取.我们可以通过不断执行sync操作来模拟.
另一种可能是进程需要进行物理内存的实际分配映射,我们可以写一个程序频繁申请内存来模拟.

majflt增长的原因通常是物理页面在磁盘中或者需要淘汰部分页到磁盘中,一般物理内存不足时会发生这种情况.

模拟内存申请程序:

1
2
3
4
5
6
7
8
9
10
11
12
13
14
15
16
17
18
19
20
21
22
#include <unistd.h>

#include <stdio.h>
#include <stdlib.h>

#define MALLOC_NUM 10000
int main() {
char *p[MALLOC_NUM];
while(1) {
for (int i = 0; i < MALLOC_NUM; i++) {
p[i] = malloc(130*1024);
}

sleep(1);

for (int i = 0; i < MALLOC_NUM; i++) {
free(p[i]);
}
}

return 0;
}

运行程序可以看到此值不断增长

1
2
3
4
5
6
7
8
# sar -B 1
Linux 5.11.0-44-generic (zhangxa-VirtualBox) 2022年01月16日 _x86_64_ (2 CPU)

11时45分27秒 pgpgin/s pgpgout/s fault/s majflt/s pgfree/s pgscank/s pgscand/s pgsteal/s %vmeff
11时45分28秒 0.00 0.00 10008.00 0.00 10658.00 0.00 0.00 0.00 0.00
11时45分29秒 0.00 0.00 10000.00 0.00 10655.00 0.00 0.00 0.00 0.00
11时45分30秒 0.00 0.00 9999.00 0.00 10654.00 0.00 0.00 0.00 0.00
11时45分31秒 0.00 172.00 9999.00 0.00 10655.00 0.00 0.00 0.00 0.0

pgfree/s:系统每秒回收的空闲内存页,当内存页空闲可以再次分配时此值会增加

我们可以通过执行sync操作看到此值的增长.

pgscank/s pgscand/s:后台kswapd进程或直接扫描过的页面,此值过高说明当前内存紧张,在频繁的扫描寻找可用内存页.

linux在内存紧张时后回收可能的内存页使用,回收操作可能由kswapd进程周期性地进行也可能在内存分配等相关路径上进行,如果pgscand/s过高
一般就说明当前内存很紧张了,而pagscank/s过高有可能时当前有较多的页释放了(如文件系统缓存),也有可能是内存紧张.

apollo平台dreamview前端代码调试方法

简介

apollo是百度开源的自动驾驶平台,本系列文章主要讲解一下平台学习中的经验和方法.

dreamview

dreamview是apollo平台的hmi界面,关于dreamview的介绍可以参考github. dreamview的代码分为frontend前端代码和backend后端代码两部分,这篇文章主要讲述frontend代码的调试方法

调试dreamview frontend代码

github上dreamview的开源代码是已经构建好的dist包,因此不方便使用chrome跟踪调试,apollo构建框架bazel默认也不会构建dreamview的fronted代码.
因此,需要我们手工编译调试版本.

具体步骤

1. 首先按照github上的步骤将apollo代码下载好并进行一次全量构建

具体步骤

2. 单独编译dreamview代码

进入代码目录

1
2
cd apollo/modules/dreamview/frontend

修改webpack配置文件,打开source-map功能

1
2
3
vim webpack.config.js:

devtool: "cheap-source-map" # 将"cheap-source-map"修改为"eval-source-map"

重新构建调试版本

1
npm run-script build
3. 启动apollo,就可以用chrome调试了
1
bash apollo/scripts/bootstrap.sh start

golang程序启动流程详解

golang程序启动流程详解

环境

go1.16.5 linux/amd64

用例

1
2
3
4
5
6
7
package main

import "fmt"

func main() {
fmt.Println(42)
}

编译

-gcflags “-N -l”: 关闭优化和内联,方便调试跟踪

1
$ go build -gcflags "-N -l" -o hello hello.go 

gdb跟踪执行流程

1
2
3
$ gdb hello

$ source /usr/lib/go/src/runtime/runtime-gdb.py # 加载Go运行时支持

预备知识:

1. GMP调度模型
  • Golang的调度器模型是”GMP”模型,P作为逻辑cpu的抽象,解决了竞争全局队列等问题.
  • M是操作系统线程,M必须关联到某个P上,从P上获取工作goroutine
  • 一个P可能有多个M,当某个M阻塞时.

GMP模型

2. runtime/proc.go中定义了一些重要的全局符号,下面分析启动流程会涉及这些符号:
1
2
3
4
5
6
var (
m0 m // 第一个m
g0 g // 第一个goroutine
mcache0 *mcache // m0的cache
raceprocctx0 uintptr // 用于竞争检测
)
  • g0: 主线程上的第一个协程g0, g0拥有这个线程的系统栈,这个栈很大.g0还有创建新协程的职责,当我们调用go func创建新协程都会在g0的栈上执行.
  • m0: 第一个工作线程,主线程
  • mcache0: m0的cache
3. tls线程私有存储

每个线程的私有存储空间,golang主要用其来设置每个m当前正在运行的goroutine,这样可以快速获取到当前上下文的goroutine. 类似于linux内核中的current宏.

4. sched全局结构

golang使用一个全局schedt结构来控制全局调度(runtime2.go),里面主要的信息如全局运行队列,所有m,所有p的状态信息,系统监控sysmon等

1
2
3
4
5
6
7
8
9
10
11
12
13
14
var (
allm *m
gomaxprocs int32
ncpu int32
forcegc forcegcstate
sched schedt
newprocs int32

// allpLock protects P-less reads and size changes of allp, idlepMask,
// and timerpMask, and all writes to allp.
allpLock mutex
// len(allp) == gomaxprocs; may change at safe points, otherwise
// immutable.
allp []*p

程序入口函数:

  • 为g0分配栈空间
1
2
3
4
5
6
7
8
9
10
11
12
13
14
15
16
17
18
19
20
21
22
23
24
25
26
27
28
29
30
runtime.asm_amd64.s:89

TEXT runtime·rt0_go<ABIInternal>(SB),NOSPLIT,$0
// copy arguments forward on an even stack
MOVQ DI, AX // x64上使用rdi,rsi传递入参, di:argc si:argv
MOVQ SI, BX // argv
SUBQ $(4*8+7), SP // 开辟栈空间,用于存放argc, argv和两个局部变量
ANDQ $~15, SP //与~15& 保障SP 16字节对齐
MOVQ AX, 16(SP) // 存储argc, argv
MOVQ BX, 24(SP) //

MOVQ $runtime·g0(SB), DI // 将g0存储到DI寄存器
LEAQ (-64*1024+104)(SP), BX // 为g0开辟64kb栈空间
MOVQ BX, g_stackguard0(DI) // 将栈底地址保存到g0->stackguard0
MOVQ BX, g_stackguard1(DI)
MOVQ BX, (g_stack+stack_lo)(DI) // 将栈底保存到g0->stack->lo
MOVQ SP, (g_stack+stack_hi)(DI) // 将栈顶保存到g0->stack->hi

// 下面是g0的结构:
type g struct {
// Stack parameters.
// stack describes the actual stack memory: [stack.lo, stack.hi).
// stackguard0 is the stack pointer compared in the Go stack growth prologue.
// It is stack.lo+StackGuard normally, but can be StackPreempt to trigger a preemption.
// stackguard1 is the stack pointer compared in the C stack growth prologue.
// It is stack.lo+StackGuard on g0 and gsignal stacks.
// It is ~0 on other goroutine stacks, to trigger a call to morestackc (and crash).
stack stack // offset known to runtime/cgo
stackguard0 uintptr // offset known to liblink
stackguard1 uintptr // offset known to liblink
  • 获取cpu相关信息
1
2
3
4
5
6
7
8
9
10
11
12
13
14
15
16
17
18
19
// find out information about the processor we're on
MOVL $0, AX // 获取CPUID信息
CPUID
MOVL AX, SI // 我本机获取到的cpuid为0xd
CMPL AX, $0 //判断是否获取到了cpuid,成功
JE nocpuinfo

// 判断cpu的型号,并设置标志,如是否是intel.
// 主要是需要确定RDTSC的获取方式,即cpu时间戳计数器
CMPL BX, $0x756E6547 // "Genu" 正式版 o
JNE notintel
CMPL DX, $0x49656E69 // "ineI"
JNE notintel
CMPL CX, $0x6C65746E // "ntel"
JNE notintel
MOVB $1, runtime·isIntel(SB) //is inel
MOVB $1, runtime·lfenceBeforeRdtsc(SB) //

...
  • 初始化tls,设置m->g0, g0->m,初始化sched信息
1
2
3
4
5
6
7
8
9
10
11
12
13
14
15
16
17
18
19
20
21
22
23
24
25
26
27
28
29
30
31
32
33
34
35
36
37
38
   MOVQ	_cgo_init(SB), AX // 查看是否有_cgo_init,如果有则需要调用,我们的例子中没有_cgo_init
TESTQ AX, AX
JZ needtls //设置tls

...
LEAQ runtime·m0+m_tls(SB), DI //获取m0中的tls结构
CALL runtime·settls(SB) // 调用sys_linux_amd64.s:658来设置tls, linux上设置tls主要是通过arch_pcrtl实现,设置当前线程的FS信息.

// store through it, to make sure it works
get_tls(BX) //下面代码主要测试tls是否正确工作.
MOVQ $0x123, g(BX)
MOVQ runtime·m0+m_tls(SB), AX
CMPQ AX, $0x123
JEQ 2(PC)
CALL runtime·abort(SB)

...
// set the per-goroutine and per-mach "registers"
get_tls(BX)
LEAQ runtime·g0(SB), CX // 将g0保存到tls中
MOVQ CX, g(BX) // save g0 to tls
LEAQ runtime·m0(SB), AX // ax -->m0

// save m->g0 = g0
MOVQ CX, m_g0(AX) //将g0保存到m0中
// save m0 to g0->m
MOVQ AX, g_m(CX) // 将m0设置到g0中

CLD // convention is D is always left cleared
CALL runtime·check(SB) //runtime1.go:137 检查一些cas和原子操作工作是否正确

MOVL 16(SP), AX // 获取之前保存到栈中的argc, argv
MOVL AX, 0(SP)
MOVQ 24(SP), AX // copy argv
MOVQ AX, 8(SP)
CALL runtime·args(SB) //runtime1.go:61 设置argc, argv到全局变量runtime1.argc, runtime1.argv
CALL runtime·osinit(SB) //301 os初始化,根据cpu亲和性获取可用cpu个数,获取大页信息
CALL runtime·schedinit(SB) //600 sched初始化,这是一个go函数,先来看一下。
1
2
3
4
type m struct {
g0 *g // goroutine with scheduling stack
...
tls [6]uintptr // thread-local storage (for x86 extern register)
sched初始化

sched内容比较多,我们详细来看一下:

1
2
3
4
5
6
7
8
9
10
11
12
13
14
15
16
17
18
19
20
21
22
23
24
25
26
27
28
29
30
31
32
33
34
35
36
37
38
39
40
41
42
43
_g_ := getg()  // 获取当前的goroutine, 之前已经保存在tls中了,getg就是从tls中获取
if raceenabled {
_g_.racectx, raceprocctx0 = raceinit()
}

sched.maxmcount = 10000 //设置最大m线程个数为10000

// The world starts stopped.
worldStopped()

stackinit() // 栈缓存初始化,golang运行时需要分配栈时优先使用缓存
mallocinit() // 内存管理初始化
fastrandinit() // must run before mcommoninit, 快速随机数初始化
mcommoninit(_g_.m, -1) // m初始化并将其放到全局allm链表中
cpuinit() // must run before alginit, cpu初始化
alginit() // maps must not be used before this call
modulesinit() // provides activeModules
typelinksinit() // uses maps, activeModules
itabsinit() // uses activeModules

sigsave(&_g_.m.sigmask) // 保存当前信号掩码到m
initSigmask = _g_.m.sigmask

goargs()
goenvs()
parsedebugvars()
gcinit() // 初始化gc

lock(&sched.lock)
sched.lastpoll = uint64(nanotime())
procs := ncpu
if n, ok := atoi32(gogetenv("GOMAXPROCS")); ok && n > 0 { //环境变量是否设置了GOMAXPROCS
procs = n
}
if procresize(procs) != nil { // 重新调整p的数量.
throw("unknown runnable goroutine during bootstrap")
}
unlock(&sched.lock)

// World is effectively started now, as P's can run.
worldStarted()

...
sched初始化就完成了,主要就是一些全局信息,包括内存,栈缓存,P的个数,gc等.

再回到汇编:

  • 设置主协程入口函数runtime.mainPC,调用newproc创建主协程
1
2
3
4
5
6
7
8
9
10
11
12
13
14
15
CALL	runtime·schedinit(SB) //600

// create a new goroutine to start program
MOVQ $runtime·mainPC(SB), AX // 新goroutine的入口函数
PUSHQ AX // 压入栈中下面传递给newproc
PUSHQ $0 // arg size
CALL runtime·newproc(SB) // 创建新的p,这也是一个go函数,重点分析一下.
POPQ AX
POPQ AX

// start this M
CALL runtime·mstart(SB) //mstart loop

CALL runtime·abort(SB) // mstart should never return
RET
newproc:
  • 创建主协程并将其放到p的本地队列中,systemstack函数表示在系统栈上执行goroutine的创建操作
1
2
3
4
5
6
7
8
9
10
11
12
13
argp := add(unsafe.Pointer(&fn), sys.PtrSize) // 获取argp
gp := getg() // 获取当前goroutine
pc := getcallerpc()
systemstack(func() { // 调用systemstack来执行
newg := newproc1(fn, argp, siz, gp, pc)

_p_ := getg().m.p.ptr()
runqput(_p_, newg, true)

if mainStarted {
wakep()
}
})
systemstack
1
2
3
4
5
6
7
8
9
10
11
12
13
14
15
16
17
18
19
20
21
22
23
TEXT runtime·systemstack(SB), NOSPLIT, $0-8
MOVQ fn+0(FP), DI // DI = fn, 将要执行的函数指针放到rdi.
get_tls(CX) // 获取当前goroutine
MOVQ g(CX), AX // AX = g, g0
MOVQ g_m(AX), BX // BX = m, m0

CMPQ AX, m_gsignal(BX) //判断当前goroutine是否是用于处理信号的goroutine
JEQ noswitch

MOVQ m_g0(BX), DX // DX = g0
CMPQ AX, DX // 判断当前goroutine是否是当前栈的使用者
JEQ noswitch // 如果是则不需要切换栈, 这里明显是,因此直接跳转到noswitch

CMPQ AX, m_curg(BX)
JNE bad

noswitch:
// already on m stack; tail call the function
// Using a tail call here cleans up tracebacks since we won't stop
// at an intermediate systemstack.
MOVQ DI, DX
MOVQ 0(DI), DI // di是之前传递给systemstack的fn
JMP DI // 执行fn
1
2
3
4
5
6
7
8
9
10
systemstack(func() {
newg := newproc1(fn, argp, siz, gp, pc) //创建新goroutine执行fn

_p_ := getg().m.p.ptr()
runqput(_p_, newg, true)

if mainStarted {
wakep()
}
})
newproc1:

newproc1的作用是为执行函数分配新的goroutine

1
2
3
4
5
6
7
8
9
10
11
12
13
14
15
16
17
18
19
20
21
22
23
24
25
26
27
28
29
30
31
32
33
34
35
36
37
38
39
40
41
42
43
44
45
46
47
48
49
50
51
52
53
54
55
56
57
func newproc1(fn *funcval, argp unsafe.Pointer, narg int32, callergp *g, callerpc uintptr) *g {
_g_ := getg() // 获取当前g

if fn == nil {
_g_.m.throwing = -1 // do not dump full stacks
throw("go of nil func value")
}
acquirem() // 锁定m,禁止抢占
siz := narg
siz = (siz + 7) &^ 7

_p_ := _g_.m.p.ptr() // 获取当前的p
newg := gfget(_p_) // 查找是否有缓存的goroutine,这些goroutine是dead状态的,可以直接使用的.如果本地没有还会从全局查找,最后都没有才会真的申请新的goroutine

if newg == nil { // 当前没有可重复使用的缓存gorutine
newg = malg(_StackMin) // 申请新的goroutine
casgstatus(newg, _Gidle, _Gdead) // 初始状态为Gdead.
allgadd(newg) // 将newg加入全局allg
}

/*为newg 准备栈和参数*/
totalSize := 4*sys.RegSize + uintptr(siz) + sys.MinFrameSize // extra space in case of reads slightly beyond frame
totalSize += -totalSize & (sys.SpAlign - 1) // align to spAlign
sp := newg.stack.hi - totalSize
spArg := sp
if usesLR {
// caller's LR
*(*uintptr)(unsafe.Pointer(sp)) = 0
prepGoExitFrame(sp)
spArg += sys.MinFrameSize
}

...
/*设置newg的sp, pc, g, startpc等 信息*/
newg.sched.sp = sp
newg.stktopsp = sp
newg.sched.pc = funcPC(goexit) + sys.PCQuantum // +PCQuantum so that previous instruction is in same function
newg.sched.g = guintptr(unsafe.Pointer(newg))
gostartcallfn(&newg.sched, fn)
newg.gopc = callerpc
newg.ancestors = saveAncestors(callergp)
newg.startpc = fn.fn

casgstatus(newg, _Gdead, _Grunnable) // 修改newg状态为runnable

if _p_.goidcache == _p_.goidcacheend {
// Sched.goidgen is the last allocated id,
// this batch must be [sched.goidgen+1, sched.goidgen+GoidCacheBatch].
// At startup sched.goidgen=0, so main goroutine receives goid=1.
_p_.goidcache = atomic.Xadd64(&sched.goidgen, _GoidCacheBatch)
_p_.goidcache -= _GoidCacheBatch - 1
_p_.goidcacheend = _p_.goidcache + _GoidCacheBatch
}
newg.goid = int64(_p_.goidcache) // 设置goroutie id.
_p_.goidcache++

...

创建好新的goroutine后,继续:

1
2
3
4
5
6
7
8
9
10
systemstack(func() {
newg := newproc1(fn, argp, siz, gp, pc) //创建新goroutine执行fn

_p_ := getg().m.p.ptr() // 获取新routine的p.
runqput(_p_, newg, true) // 将新routine放入运行队列. 首先尝试放入本地队列,如果本地队列满则放入全局队列.本地队列最大256.

if mainStarted {
wakep()
}
})
新goroutine创建完成,再启动一个m,这个m目前是主线程,即m0
1
2
3
4
5
6
7
8
9
CALL	runtime·newproc(SB)
POPQ AX
POPQ AX

// start this M
CALL runtime·mstart(SB) //调用mstart启动m

CALL runtime·abort(SB) // mstart should never return
RET
初始化m0,设置线程id
1
2
3
4
5
6
7
8
func minit() {
minitSignals() // 初始化信号处理,设置信号处理栈和掩码

// Cgo-created threads and the bootstrap m are missing a
// procid. We need this for asynchronous preemption and it's
// useful in debuggers.
getg().m.procid = uint64(gettid()) //设置m的procid,即线程id
}
  • m0,g0都初始化完成后就开始执行主协程,这时通过汇编代码gogo执行主协程
1
2
3
4
5
6
7
8
9
10
11
12
13
14
15
16
TEXT runtime·gogo(SB), NOSPLIT, $16-8
MOVQ buf+0(FP), BX // gobuf
MOVQ gobuf_g(BX), DX
MOVQ 0(DX), CX // make sure g != nil
get_tls(CX)
MOVQ DX, g(CX)
MOVQ gobuf_sp(BX), SP // restore SP
MOVQ gobuf_ret(BX), AX
MOVQ gobuf_ctxt(BX), DX
MOVQ gobuf_bp(BX), BP
MOVQ $0, gobuf_sp(BX) // clear to help garbage collector
MOVQ $0, gobuf_ret(BX)
MOVQ $0, gobuf_ctxt(BX)
MOVQ $0, gobuf_bp(BX)
MOVQ gobuf_pc(BX), BX // 执行之前的runtime.mainPC,即主协程入口
JMP BX
  • 执行主协程入口proc.go: main

主协程会启动sysmon线程进行监控,然后执行package main里我们实现的main函数

1
2
3
4
5
6
7
8
9
10
11
12
13
14
15
...
mainStarted = true // 设置main开始标志,这样才允许新协程启动新的M.

if GOARCH != "wasm" { // no threads on wasm yet, so no sysmon
// For runtime_syscall_doAllThreadsSyscall, we
// register sysmon is not ready for the world to be
// stopped.
atomic.Store(&sched.sysmonStarting, 1)
systemstack(func() {
newm(sysmon, nil, -1) // 启动sysmon
})

...
fn := main_main // 执行package main中主函数
fn()

上面就是一个go程序的启动流程,总结一下:

go程序启动流程

我们再来分析一下调用go func创建协程的流程

go func流程

  • go func关键字会被编译器转换为runtime.newproc调用创建新协程
  • 新协程加入当前p的本地队列
  • 如果本地队列已满,则批量将一半的goroutine放入全局队列
  • 之前主协程已经设置了mainStarted标志,因此会调用wakeup尝试唤醒更多空闲的p来工作

C语言中协程调度实现原理

协程切换原理

使用glibc中<ucontext.h>提供的相关函数

用户态切换简单来说就是保存当前上下文,切换到新的上下文.
用户态程序的上下文一般包含如下信息:

  • 各种寄存器
  • 信号掩码: linux信号掩码是基于线程的,协程也需要支持单独设置信号掩码信息

我们来看一下glibc定义的用户态上下文结构ucontext_t:

1
2
3
4
5
6
7
8
9
10
typedef struct ucontext_t
{
unsigned long int __ctx(uc_flags);
struct ucontext_t *uc_link; // 链接下一个ucontext_t,当前上下文结束后自动切换到这个上下文,用于被动切换
stack_t uc_stack; // 当前上下文的栈信息, 24字节
mcontext_t uc_mcontext; // 当前上下文的通用寄存器, 23个通用寄存器,1个指向fpu结构的指针,64字节保留信息. 总共256字节
sigset_t uc_sigmask; //当前上下文的信号掩码, 128字节
struct _libc_fpstate __fpregs_mem; // fpu相关寄存器
unsigned long long int __ssp[4];
} ucontext_t; // 总共968字节

通过上述结构定义,我们也可以看出,用户态上下文主要就是寄存器和栈,另外还有信号掩码信息.

ucontext相关api实现

由于ucontext api使用汇编代码实现,因此我们先来学习一些汇编基础知识.
  • x64上使用rdi, rsi, rdx, rcx, r9, r10传递参数,如果参数大于6个则使用栈
  • leaq指令用于取地址,类似于c中的&
另外为了理解如何保存当前栈和指令寄存器,我们要熟悉一下x64上函数调用的相关知识:

x64函数调用规范

    1. 当上一个函数使用call指令调用当前函数时,会将上一个函数的返回地址prev rip压入栈中,这样当被调用函数调用ret指令返回时就会从栈中pop出这个地址进行返回
    1. 当前函数执行时,会将上一级函数的rbp压入栈中,用于函数返回时还原,然后将rbp设置为当前的栈底,再调用rsp开辟当前函数的栈.
    1. 现在我们考虑在当前函数中调用getcontext会发生什么, 通过call调用getcontext后,当前函数的返回地址current rip被压入栈中:

1. 保存当前上下文

getcontext能够将当前的上下文信息保存起来,用于后面还原.我们来看下具体实现:

函数原型
1
int getcontext(ucontext_t *ucp);
函数详解
1
2
3
4
5
6
7
8
9
10
11
12
13
14
15
16
17
18
19
20
21
22
23
24
25
26
27
28
29
30
31
32
33
34
35
36
37
38
39
40
41
42
43
44
45
46
47
48
49
50
ENTRY(__getcontext)
/* Save the preserved registers, the registers used for passing
args, and the return address. */
movq %rbx, oRBX(%rdi) // rdi即为每一个函数参数,即我们传递的ucontext_t
movq %rbp, oRBP(%rdi)
movq %r12, oR12(%rdi)
movq %r13, oR13(%rdi)
movq %r14, oR14(%rdi)
movq %r15, oR15(%rdi)

movq %rdi, oRDI(%rdi)
movq %rsi, oRSI(%rdi)
movq %rdx, oRDX(%rdi)
movq %rcx, oRCX(%rdi)
movq %r8, oR8(%rdi)
movq %r9, oR9(%rdi) // 保存所有的通用寄存器到ucontext_t中

movq (%rsp), %rcx //
movq %rcx, oRIP(%rdi) // 通过上述分析,我们知道当前rsp里保存的是函数的返回地址,将其保存到ucontext_t中
leaq 8(%rsp), %rcx /* Exclude the return address. */
movq %rcx, oRSP(%rdi) // 将当前函数的rsp保存起来,注意这里+8是为了跳过刚才的函数返回地址.
...
leaq oFPREGSMEM(%rdi), %rcx // 保存浮点计算相关寄存器
movq %rcx, oFPREGS(%rdi)
/* Save the floating-point environment. */
fnstenv (%rcx)
fldenv (%rcx)
stmxcsr oMXCSR(%rdi)

/* Save the current signal mask with
rt_sigprocmask (SIG_BLOCK
, NULL, set,_NSIG/8). */
/* 保存当前的信号掩码,这里通过rt_sigprocmask系统调用实现的 */
leaq oSIGMASK(%rdi), %rdx // 通过rdx传递第3个参数,即ucontext中uc_sigmask的地址
xorl %esi,%esi // 第2个参数为NULL
#if SIG_BLOCK == 0
xorl %edi, %edi
#else
movl $SIG_BLOCK, %edi // 第一个参数为SIG_BLOCK
#endif
movl $_NSIG8,%r10d // 第4个参数
movl $__NR_rt_sigprocmask, %eax // 调用系统调用rt_sigprocmask
syscall
cmpq $-4095, %rax /* Check %rax for error. */
jae SYSCALL_ERROR_LABEL /* Jump to error handler if error. */

/* All done, return 0 for success. */
xorl %eax, %eax // 系统调用成功返回
ret
PSEUDO_END(__getcontext)

2. 设置上下文:

setcontext函数能够还原之前的ucontext_t中的状态.

函数原型:
1
int setcontext(const ucontext_t *ucp);
实现详解:
1
2
3
4
5
6
7
8
9
10
11
12
13
14
15
16
17
18
19
20
21
22
23
24
25
26
27
28
29
30
31
32
33
34
35
36
37
38
39
40
41
42
43
44
45
46
47
48
49
50
51
52
53
54
55
56
57
58
59
60
61
62
63
64
65
66
67
68
69
70
71
72
73
74
ENTRY(__setcontext)
/* Save argument since syscall will destroy it. */
pushq %rdi // rdi即我们传递的ucontext_t,将其保存到栈里,因为后面系统调用会破坏rdi,我们先保存起来
cfi_adjust_cfa_offset(8) //这是汇编指令,用于实现cfi功能,与我们讨论的内容无关可以不用关心,如果感兴趣可以看下面的文章了解:
https://stackoverflow.com/questions/51962243/what-is-cfi-adjust-cfa-offset-and-cfi-rel-offset

https://blog.csdn.net/pwl999/article/details/107569603

/* Set the signal mask with
rt_sigprocmask (SIG_SETMASK, mask, NULL, _NSIG/8). */
/* 设置ucontext_t中的信号掩码*/
leaq oSIGMASK(%rdi), %rsi //将之前保存的信号掩码设置到rsi即rt_sigprocmask第2个参数
xorl %edx, %edx
movl $SIG_SETMASK, %edi
movl $_NSIG8,%r10d
movl $__NR_rt_sigprocmask, %eax
syscall
/* Pop the pointer into RDX. The choice is arbitrary, but
leaving RDI and RSI available for use later can avoid
shuffling values. */
popq %rdx // 还原之前保存的ucontext_t
cfi_adjust_cfa_offset(-8)
cmpq $-4095, %rax /* Check %rax for error. */
jae SYSCALL_ERROR_LABEL /* Jump to error handler if error. */

/* Restore the floating-point context. Not the registers, only the
rest. */
movq oFPREGS(%rdx), %rcx //恢复之前的浮点寄存器
fldenv (%rcx)
ldmxcsr oMXCSR(%rdx)


/* Load the new stack pointer, the preserved registers and
registers used for passing args. */
cfi_def_cfa(%rdx, 0)
cfi_offset(%rbx,oRBX)
cfi_offset(%rbp,oRBP)
cfi_offset(%r12,oR12)
cfi_offset(%r13,oR13)
cfi_offset(%r14,oR14)
cfi_offset(%r15,oR15)
cfi_offset(%rsp,oRSP)
cfi_offset(%rip,oRIP)

movq oRSP(%rdx), %rsp //还原保存的rsp
movq oRBX(%rdx), %rbx //还原之前保存的rbx
movq oRBP(%rdx), %rbp //还原之前保存的rbp和其它通用寄存器
movq oR12(%rdx), %r12
movq oR13(%rdx), %r13
movq oR14(%rdx), %r14
movq oR15(%rdx), %r15
...
/* The following ret should return to the address set with
getcontext. Therefore push the address on the stack. */
movq oRIP(%rdx), %rcx //将原来保存的rip压入栈中
pushq %rcx

movq oRSI(%rdx), %rsi
movq oRDI(%rdx), %rdi
movq oRCX(%rdx), %rcx
movq oR8(%rdx), %r8
movq oR9(%rdx), %r9

/* Setup finally %rdx. */
movq oRDX(%rdx), %rdx //恢复原来的rdx

/* End FDE here, we fall into another context. */
cfi_endproc
cfi_startproc

/* Clear rax to indicate success. */
xorl %eax, %eax
ret // ret指令会将之前`pushq %rcx`压入栈中的old rip弹出执行,这样就执行回之前上下文的指令了
PSEUDO_END(__setcontext)

下面的图示详细展示了执行setcontext后的栈布局:

setcontext返回

一个例子

下面我们通过getcontext, setcontext来实现一个示例直观理解一下:

1
2
3
4
5
6
7
8
9
10
11
12
13
14
15
#include <stdio.h>
#include <stdlib.h>
#include <unistd.h>
#include <ucontext.h>

int main()
{
ucontext_t uc;

getcontext(&uc); // 保存当前上下文
printf("hello the world\r\n");
sleep(1);
setcontext(&uc); // 还原之前上下文,代码又执行到printf了.
return 0;
}

执行上面代码会看到反复打印”hello the world”

1
2
3
4
5
6
7
安哥6@ubuntu:~$ ./a.out
hello the world
hello the world
hello the world
hello the world
hello the world
...

上面的两个函数只实现了简单的保存当前上下文和设置上下文的功能,要实现更复杂的协程切换,我们需要灵活地创建上下文和在两个上下文之间切换,因此makecontext, swapcontext就派上用场了:

3. makecontext

makecontext能够让我们设置栈的位置,要执行的函数即要传递的参数,这样就具备了创建协程运行环境的功能.

函数原型
1
void makecontext(ucontext_t *ucp, void (*func)(), int argc, ...);
  • ucp: 上下文结构
  • func: 关联的函数
  • argc: 关联的函数的参数个数
  • …: 关联的参数
函数详解
  • uc_link解释: 当我们创建的ucontext_t中的函数执行结束后,应该切换到哪里去?为了能够指明这个信息,ucontext_t中有一个uc_link指针,它指向另外一个ucontext_t结构,这就是uc_link的作用.

  • 跳板代码: (__start_context函数)
    由跳板代码完成uc_link的加载和切换,这样ucontext_t结束时就能切换到uc_link.
    跳板代码放在ucontext_t函数栈的最顶端,这样ucontext_t结束时就能通过ret弹出并执行了.

1
2
3
4
5
6
7
8
9
10
11
12
13
14
15
16
17
18
19
20
21
22
23
24
25
26
27
28
29
30
31
32
33
34
35
36
37
38
39
40
41
42
43
44
45
46
47
48
49
50
51
52
53
54
__makecontext (ucontext_t *ucp, void (*func) (void), int argc, ...)
...

/* Generate room on stack for parameter if needed and uc_link. */
sp = (greg_t *) ((uintptr_t) ucp->uc_stack.ss_sp
+ ucp->uc_stack.ss_size); // 首先设置sp的值,由我们传入的ucp中的sp和大小相加
sp -= (argc > 6 ? argc - 6 : 0) + 1; // 如果参数大于6个,则需要额外开辟栈空间,额外再加1是要为uc_link预留空间
/* Align stack and make space for trampoline address. */
sp = (greg_t *) ((((uintptr_t) sp) & -16L) - 8);  //sp字节对齐并为跳板代码预留空间.


idx_uc_link = (argc > 6 ? argc - 6 : 0) + 1; // 根据参数个数计算uc_link在sp中的位置

/* Setup context ucp. */
/* Address to jump to. */
ucp->uc_mcontext.gregs[REG_RIP] = (uintptr_t) func; //保存func地址到rip
/* Setup rbx.*/
ucp->uc_mcontext.gregs[REG_RBX] = (uintptr_t) &sp[idx_uc_link]; //rbx设置uc_link在sp中的地址
ucp->uc_mcontext.gregs[REG_RSP] = (uintptr_t) sp; //保存sp

...
sp[0] = (uintptr_t) &__start_context; //跳板代码地址,切换上下文时通过跳板代码实现
sp[idx_uc_link] = (uintptr_t) ucp->uc_link; //存储uc_link地址

va_start (ap, argc);

/*下面代码是将要传递的参数保存起来*/
for (i = 0; i < argc; ++i)
switch (i)
{
case 0:
ucp->uc_mcontext.gregs[REG_RDI] = va_arg (ap, greg_t);
break;
case 1:
ucp->uc_mcontext.gregs[REG_RSI] = va_arg (ap, greg_t);
break;
case 2:
ucp->uc_mcontext.gregs[REG_RDX] = va_arg (ap, greg_t);
break;
case 3:
ucp->uc_mcontext.gregs[REG_RCX] = va_arg (ap, greg_t);
break;
case 4:
ucp->uc_mcontext.gregs[REG_R8] = va_arg (ap, greg_t);
break;
case 5:
ucp->uc_mcontext.gregs[REG_R9] = va_arg (ap, greg_t);
break;
default:
/* Put value on stack. */
sp[i - 5] = va_arg (ap, greg_t); //大于6个参数用栈保存
break;
}
va_end (ap);

4. swapcontext

将当前上下文保存并切换到另一个上下文中

函数原型
1
int swapcontext(ucontext_t *oucp, const ucontext_t *ucp);

详细实现

swapcontext的前半部分和getcontext类似保存当前上下文,后半部分和setcontext类似,因此只分析关键部分

1
2
3
4
5
6
7
8
9
10
11
12
13
14
15
16
17
18
19
20
21
22
23
24
25
26
27
    /* Load the new stack pointer and the preserved registers.  */
movq oRSP(%rdx), %rsp /*还原通用寄存器*/
movq oRBX(%rdx), %rbx
movq oRBP(%rdx), %rbp
movq oR12(%rdx), %r12
movq oR13(%rdx), %r13
movq oR14(%rdx), %r14
movq oR15(%rdx), %r15
...
/* The following ret should return to the address set with
getcontext. Therefore push the address on the stack. */
movq oRIP(%rdx), %rcx // 将新context_t中的rip放入栈中,这样下面的`ret`指令就会弹出并执行了
pushq %rcx

/* Setup registers used for passing args. */
movq oRDI(%rdx), %rdi
movq oRSI(%rdx), %rsi
movq oRCX(%rdx), %rcx
movq oR8(%rdx), %r8
movq oR9(%rdx), %r9

/* Setup finally %rdx. */
movq oRDX(%rdx), %rdx

/* Clear rax to indicate success. */
xorl %eax, %eax
ret // 从栈中弹出新ucontext_t的`rip`并执行
swapcontext后的栈布局

swapcontext

最后我们看一下当切换后的ucontext_t执行完后如何通过跳板代码执行到uc_link.

跳板代码实现
1
2
3
4
5
6
7
8
9
10
11
12
13
14
15
16
17
18
19
20
21
22
23
24
ENTRY(__start_context)
/* This removes the parameters passed to the function given to
'makecontext' from the stack. RBX contains the address
on the stack pointer for the next context. */
movq %rbx, %rsp // 取出uc_link地址

/* Don't use pop here so that stack is aligned to 16 bytes. */
movq (%rsp), %rdi // 将uc_link的值放入rdi,准备setcontext
testq %rdi, %rdi // 如果uc_link是NULL,则退出程序
je 2f /* If it is zero exit. */

call __setcontext // 调用__setcontext完成上下文设置,uc_link已放入rdi,即第一个参数.
/* If this returns (which can happen if the syscall fails) we'll
exit the program with the return error value (-1). */
movq %rax,%rdi

2:
call HIDDEN_JUMPTARGET(exit)
/* The 'exit' call should never return. In case it does cause
the process to terminate. */
L(hlt):
hlt
END(__start_context)